background

welcome to Cherries and Figs- adventures in the kitchen. It's my place for jotting down food thoughts, delicious recipes, and all things culinary. So, sit down, get comfy and join me in my kitchen....
Showing posts with label main dish. Show all posts

Thursday, March 15, 2012

Freezer Dinners


You know those nights when you're too tired to put together a delicious meal after a long day of errands, shopping or work? At that moment you just want to head out to a restaurant because it's so much easier than spending the next hour cooking but don't- instead I've got the solution that'll save you effort, time and cost- freezer dinners!
Freezer dinners are meals you put together on your free time, and then assemble and freeze until you need them. The night before, you take one out and defrost in the refrigerator and cook as directed. In no time you've got a delicious, healthy and simple meal with very little effort except grilling, baking or roasting in the oven. Today I managed to whip up 5 dinners in 45 minutes that will be ready for use in the next couple of weeks. I'll share two of my easy recipes below and in upcoming weeks I'll share more. Hopefully these will work out for your family as well as they do with mine :)

Fish with Mustard Nut Crust (serves 4 from A Decade of Cooking The Costco Way)
3 Tbsp. butter
1/4 cup whole grain mustard
1/2 cup chopped nuts (I used almonds, but you could use hazelnuts or pine nuts as well)
4 fish fillets (I use tilapia but any white fish is great)
salt, cayenne pepper
3 tbsp. chopped fresh thyme
1/2 cup white wine

In a food processor, mix nuts, mustard, and butter until resembles a coarse paste. Set aside.
Lay 4 fish fillets in a freezable and oven proof container, sprinkle with salt and cayenne pepper to taste. Spread nut butter over fish in an even layer and sprinkle with thyme. Pour wine around fish, cover tightly and freeze with the following instructions: Day of cooking- preheat oven to 500 degrees. Bake, uncovered for 10-15 minutes or until the fish is flakey and the crust is bubbly. Serve immediately.


Honey and Mustard Glazed Sausages (serves 4)
5-6 uncooked italian sausages (mild, medium or hot)
1/4 c. whole grain mustard
1/4 c. honey
salt, pepper to taste
1-2 tbsp. chopped parsley

place uncooked italian sausages in a freezer safe and oven proof container. Meanwhile, mix the honey, salt and pepper in a small bowl and pour over sausages. Sprinkle with a little chopped parsley, cover and freeze with the following instructions: Day of cooking- preheat and then roast sausages at 400 degrees for 20-30 minutes or until sausages are cooked through. Halfway through cooking, turn sausages over once to glaze on bottom side. Serve immediately and enjoy

Saturday, April 9, 2011

Creamy Lemony Eggs with Prosciutto


Want a knockout dish for brunch this weekend? Something out of the ordinary, but comforting, rich and just 6 ingredients? Creamy, Lemony eggs with Prosciutto is the perfect recipe to start the weekend off right.
I've recently bought the cookbook, Radically Simple by Rozanne Gold because I wanted to add recipes to my repertoire that were simple to make but didn't sacrifice on the wow factor or flavor. This cookbook and recipe has become one of my staples- my family requests several recipes from Rozanne's collection, and I have made the creamy lemony eggs with prosciutto for several friends and received wonderful reviews. The ingredients are simple, just eggs, lemon, prosciutto, butter, English muffins and chives. The original recipe doesn't call for English muffins but I stack everything on top of the toasted bread and I think it adds that je ne sais quoi. Sound too simple to impress? Not so. The difference is in the way the eggs are cooked. Instead of pan frying the eggs, you ever so gently cook them in a double boiler just like hollandaise, and the result? Pure perfection. The creamiest eggs you've ever had with a hint of lemon. People will swear you've added tons of cheese and cream because of the texture. The eggs are super creamy and luscious. Simply delicious! If you don't have a double boiler, don't let that scare you off. The truth is, I don't have one either. You can make an easy version by placing a heatproof bowl (I used a big glass bowl) over a big pot of gently boiling water.

Just take care not to have the bottom of the bowl touch the hot water. One word of advice- take your time with the eggs, baby them. Trust me, in the end it will be so worth it. Bon Appetit!

Creamy Lemony Eggs with Prosciutto serves 4
6 oz. thinly sliced prosciutto
6 extra-large eggs plus 3 egg whites
grated zest and juice of 1 lemon
2 Tbsp. unsalted butter, melted
3 Tbsp. of chopped fresh chives
4 English muffins, split and toasted

Line the centers of the plates with the toasted English muffins. Place prosciutto on top of the muffins, overlapping the slices. Set aside.
Combine the eggs and whites and beat with a whisk until thoroughly mixed. Add the lemon zest, melted butter, juice of the lemon and salt and pepper to taste. Mix well.
Bring several inches of water to boil in the bottom of a double boiler. Reduce heat to a rolling simmer. Add your egg mixture to the top of the double boiler. Cook, stirring constantly with a rubber spatula, until the eggs have thickened into small curds, about 10-15 minutes. Spoon the hot eggs onto the prosciutto and English muffins. Garnish with chives.

*note: I have changed Roxanne's original recipe- my changes are included. I have also made these eggs substituting thinly sliced lox when I didn't have prosciutto on hand. Both work equally well with the lemony creamy eggs. Here's a photo of the salmon version

Sunday, January 23, 2011

Szechwan Style Shrimp Stir-Fry


This week I've been trying to cut back on calories and fat without sacrificing good taste. I want a recipe that's easy to execute and quick to cook. Hmmm... low fat, low calorie, quick, easy and delicious- sound impossible? Not so with this meal. Try it and you won't be dissapointed. You may even re-think ordering Chinese take out next time

Szechwan Style Shrimp (serves 4)
1 1/4 lb. fresh medium sized shrimp
4 tsp. reduced- sodium soy sauce
4 tsp. grated fresh ginger or 3/4 tsp. ground ginger
1 Tbsp. sherry or water
1 tsp. cornstarch
2 tsp. toasted sesame oil
1 Tbsp. chili sauce with garlic (Mae Ploy or similar)
salt, pepper to taste

1 1/2 tsp. reduced soduim soy sauce
1/2 tsp. cornstarch
4 tsp. canola oil
4 cloves garlic, thinly sliced
1 pkg fresh mushrooms, sliced
1 red bell pepper, cut into strips
2 c. fresh pea pods or snow peas
1/2 head Napa cabbage, shredded
1/4 c. cashews
3 Tbsp. sliced green onion

Peel and devein shrimp. Rinse shrimp, pat dry with paper towels. For sauce, in a small bowl combine the 4 tsp. soy sauce, ginger, sherry, chili sauce, 1 tsp. cornstarch, sesame oil and salt/pepper. Set aside.
Place shrimp in med. size bowl and season with salt and pepper. Stir in 1 1/2 tsp. soy sauce and 1/2 tsp. corn starch. Set aside.
In a wok or 12 inch skillet, heat 2 tsp of the canola oil over med-high heat. Add garlic and stir-fry for 30 seconds. Add mushrooms and stir fry for 3 minutes. Add bell pepper, and stir fry for 2 minutes. Add peas and stir fry for 2 minutes. Remove ingredients from wok.
Add remaining 2 tsp. canola oil to wok. Add shrimp mixture, stir fry for 2-3 minutes or until shrimp turn opaque. Stir sauce and add to wok. Cook and stir until boiling. Add mushroom mixture and chinese cabbage. Toss to coat.
To serve, sprinkle with chopped cashews and green onions

Wednesday, January 12, 2011

Lazy Lasagna


I love to cook, and find it really rewarding to make dishes my family will enjoy and request again. Many hours are (mostly) happily spent poring over recipe books, shopping for just the right ingredients, chopping and prepping and then cooking or baking. I especially love to find recipes that feature 'exotic' and really flavorful ingredients like curry, ginger or fennel or try out recipes that leave us getting hungrier by the minute, enticed by the delicious smells of ingredients working their magic.
But, it would be a lie to say that I always love laborious recipes. There are those days when I'm just beat from the daily activities or don't want to spend 45 minutes babysitting a pan of risotto. Times when I just want to throw something easy together and forget about it while the dish does it's own thing in the oven. Evenings when I need to help my girls with homework projects or want to just veg out with a great book on the couch. Does any of this sound familiar to you? Well, tonight's one of those nights and I'll share my secret with you. It's called Lazy Lasagna. Only seven ingredients and about 20 minutes of your time actually putting it all together before it bakes to comforting cheesy-gooey, delectable and satisfying goodness. You don't even have to pre-boil the noodles! Ready? Let's get dinner started...

Lazy Lasagna (makes 1 9X11 pan)
1 lb. ground beef or turkey
32 oz. jar of your favorite spaghetti sauce
1 lb. cottage cheese
8 oz. sour cream
8 uncooked lasagna noodles
12 oz. shredded Italian cheese blend
1/2 c. grated Parmesan cheese
1 c. water

Preheat oven to 350 degrees. Brown meat, drain, and add spaghetti sauce. Reduce heat to low and heat thoroughly. Combine cottage cheese and sour cream and blend in a bowl. Spoon 1/3 of the meat sauce in bottom of pan. Put 4 noodles over sauce, 1/2 of cheese mixture, 1/3 of the shredded cheese mixture and Parmesan. Repeat. Top with remaining meat sauce and cheese. Pour water around the sides of the pan and cover tightly with foil (I lightly spray the underside of the foil with oil so the cheese doesn't stick). Bake for 1 hour. Uncover, and bake 20 more minutes or until bubbly. Let stand 15 minutes and enjoy your lazy lasagna!

Tuesday, January 11, 2011

Salade Nicoise


Ask 10 people what ingredients comprise a Nicoise salad, and you may get many different answers. Typically, a true salad Nicoise consists of haricot verts, anchovies and potatoes, but has evolved to sometimes include tuna or even salmon, boiled eggs, tomatoes, olives, bell peppers, artichoke hearts, capers and/or onions.
This salad traces its origins to Nice, France- and therefore, I believe it should be full of big, assertive flavors to mirror the bold and saucy culture found along the coast. If you've ever been to Marseille or Cassis, you know exactly what I mean.
Because the salad has several different components it's a labor of love and won't be ready in just a few minutes. But, because it's a composed salad with varied textures and flavors, your taste buds will thank you with every bite. I like to dress each component before layering on a platter. The recipe for garlic aioli follows, and is, in my opinion an absolute must for this salad. Trust me, you won't get the same garlicky bold flavor without it. Eating this makes me think of warm sunny days by the ocean. All I need with it is a nice glass of wine and maybe even a chunk of toasted bread.

Salade Nicoise (serves 4)
1 lb. haricot verts, lightly blanched but still crunchy
1 lb. baby new potatoes
4-6 anchovy fillets, rinsed
1 can of albacore tuna, drained
5 soft-center hard cooked eggs
basil leaves
head of lettuce
2 tomatoes, cut into 6 pieces each
assorted marinated olives
premade french vinaigrette (or recipe follows)
garlic aioli (recipe follows)

Boil 1/3 cup of water, and a pinch of salt and add baby potatoes. Cover tightly and steam, stirring occasionally until fork tender. Drain water if any remains and toss lightly with vinaigrette while still warm. Set aside to cool.
Meanwhile, tear lettuce and basil into slightly bigger than bite size pieces and toss lightly with vinaigrette. Arrange on large platter. Lightly dress and toss blanched haricot verts and lay in a section over the lettuce. Cut boiled eggs in half, arrange on platter and season with salt and pepper. Drape the anchovy fillets over some of the eggs. Mound the drained tuna in the middle of the lettuce leaves. Lightly toss cut tomatoes with vinaigrette and arrange in another section over the lettuce. Arrange cooled baby potatoes over lettuce. Sprinkle the olives in the last available section over the lettuce.
Serve immediately at room temperature with the garlic aioli, making sure to get a little bit of everything. Bon Appetit!

Simple French Vinaigrette
1 shallot, finely diced
1 large garlic clove, minced
3-4 T. red wine vinegar
salt, pepper to taste
1 cup extra virgin olive oil
1 tsp. Dijon mustard

Add all ingredients and shake together to create vinaigrette.

Garlic Aioli
1 large egg yolk, at room temperature
1 cup extra virgin olive oil
salt, pepper to taste
3-4 cloves garlic, smashed to a paste with a little bit of salt

Put egg yolks in a bowl and stir with a whisk until slightly thickened. Add a spoonful of oil at a time, whisking well as an emulsion begins to form. Continue whisking until finished sauce is as thick as softly whipped cream. Add salt, pepper and garlic, stir and let aioli sit for a few minutes to incorporate all the flavors. Serve immediately with salade Nicoise.

Sunday, December 26, 2010

Baked Portobella Caps with Melted Goat Cheese


If you're like me, chances are you probably over-indulged during the holidays (and still intend to do so up until New Years). No need to beat yourself up about it, I've got the perfect solution for a meatless, low carb and low calorie dinner you can have ready to eat in under an hour. Baked Portobella Caps with Melted Goat Cheese taste indulgent and rich but is a meal you can feel good about- I've adapted this recipe from the South Beach Diet Cookbook. Anyone who's had portobella mushrooms knows how hearty they are, and as such are often a great substitute for traditional meat in burgers. Pair the 'meaty' mushrooms with the tart flavor of goat cheese, crunchy pine nuts and zesty marinara sauce and you've got a sure fire winner.

Baked Portobella Caps with Melted Goat Cheese

*feel free to add any veggies you may have on hand for the filling. Zucchini, squash, bell peppers, leeks or celery would all be great in this recipe as well.


28 oz. marinara sauce
4-6 portobella mushrooms (depending on size)
1/4 c. chopped fresh basil
2 T. pine nuts
4-5 cloves chopped garlic
1 carrot, small dice
1/4 onion, minced
3 mushroom stems, small dice
1/2 tbsp. dried italian herbs
salt, pepper to taste
4 oz. goat cheese
1/2 T. olive oil


Preheat the oven to 375 degrees. Spread the sauce in the bottom of a 9X11 baking dish. Having already removed the mushroom stems for chopping, scrape out the gills with a spoon and discard.
Meanwhile, place a pan on the oven and heat to medium high. Add the olive oil, then the carrot, onion, mushroom stems, salt and pepper. Cook, stirring occasionally for about 5 minutes. Add the italian herbs, basil, pine nuts and garlic, stirring for an additional 2 minutes. Remove pan from heat and add goat cheese, stirring to combine.
Fill the mushroom caps with the goat cheese and veggie mixture.
Bake for 25-30 minutes, or until hot and bubbly. Serve with the marinara sauce.

Sunday, July 11, 2010

Peach Caprese Panini


We've all had caprese salads and sandwiches, right? You know, tomato, basil, mozzarella, olive oil and balsamic vinegar. There's a variation of this at one of my favorite restaurants that adds sundried tomatoes and olives and I absolutely love it, but tonight I'm not talking about your standard caprese. Tonight I'm talking about a peach caprese panini. Peaches? That's right- one of summers best fruits in lieu of the tomato. How about adding some prosciutto? Uh huh :) The flavors all come together beautifully, trust me. The salty prosciutto, the sweet peaches and reduced balsamic, the herby basil, the melted mozzarella- they all work together to create this harmony of flavors that ups the ante on caprese. So when you're at the farmers market this summer and happen to see those beautiful ripe peaches and basil, try this recipe and tell me what you think.

Peach Caprese Panini (serves 4)
1 loaf cibatta bread or similar bread sliced thinly
olive oil for brushing
1/2 c. balsamic vinegar
basil leaves
ripe peaches, sliced thinly
1/2 lb thinly sliced prosciutto
12 oz. fresh mozzarella balls
fresh ground pepper

This is a loose recipe- feel free to add more or less of the ingredients to your taste.

Pour balsamic vinegar into a small saucepan and place over medium heat until vinegar reduces by about half and it becomes thick and syrupy. Remove from heat and set aside.
Preheat your panini grill. If you don't have a panini grill, you can use a large skillet heated over medium. When you place your sandwich on the skillet, press down with something heavy, turn over and press again while second side cooks.
Assemble your sandwiches by brushing some of the balsamic syrup over one side of the bread. Place your mozzarella in a layer, then add basil, sliced peaches and prosciutto. Top with second piece of bread and brush lightly on outsides with olive oil. Heat in the panini grill or over a skillet until cheese starts to melt and you get a nice browned crust. Buon Appetito!

Thursday, May 13, 2010

Bacon Wrapped Pork Loin with Morel Mushrooms


What do you get when you combine the flavors of bacon, creme fraiche, wild morel mushrooms, pork loin, garlic and white wine? Pure perfection . Our local CSA had wild morel mushrooms available this week and I had the perfect recipe to go with them in the cookbook A Platter of Figs by chef David Tanis. It was pure perfection- did I mention that already? Originally the recipe called for veal, but since we don't eat veal, I decided to substitute a pork loin instead and it worked out beautifully. The finished dish was not only beautiful on the plate, but one bite and I was completely done for. The earthiness of the morels swimming in the cream sauce was the perfect compliment to the tender pork and slightly salty bacon. This is one recipe I know we'll definitely be making again real soon.


Bacon Wrapped Pork Loin with Morel Mushrooms (serves 4)
1 pork loin
salt, pepper to taste
4 garlic cloves, sliced
a few rosemary and thyme sprigs
4-5 slices thinly sliced pancetta or bacon
1/2 lb. morel mushrooms
2 tbsp. butter
1 shallot, finely chopped
2 cups chicken stock
1/4 c. white wine
1/2 cup creme fraiche or heavy cream

Season the loin with salt and pepper. Make shallow slits into the loin and insert the garlic slices into the meat. Roughly chop the rosemary and thyme sprigs and press them onto the pork loin. Wrap the pancetta or bacon strips around the loin and place in a pan. Refrigerate for at least an hour.
Bring the meat to room temperature, and preheat the oven to 400 degrees. Roast the pork for 30-45 minutes, until the internal temperature is at least 150 degrees but not more than 160 degrees. Let the meat rest, loosely covered for at least 10 minutes before slicing.
While the pork loin is cooking, prepare the sauce. Over high heat, reduce the stock by half to yield one cup. Set aside. Swish the mushrooms quickly in a large bowl of salted water, then lift them out and pat dry. Trim and discard tough stems. Coarsely chop the morels, or if they're small, cut them in half.
Melt the butter in a saucepan. Slowly saute the shallots in the butter, stirring occasionally until lightly browned. Turn up the heat and add the mushrooms, salt and pepper. Stew the mushrooms with the shallots for a minute or two, then add the reduced stock and white wine. Simmer gently for 10-15 minutes.
When the pork loin is out of the oven and resting, pour off the fat from the roasting pan. Add to the morels and stock. Stir in the creme fraiche and simmer the sauce for 10 minutes more.
Slice the meat, arrange on a platter and spoon over the mushroom sauce. Enjoy!

Tuesday, May 11, 2010

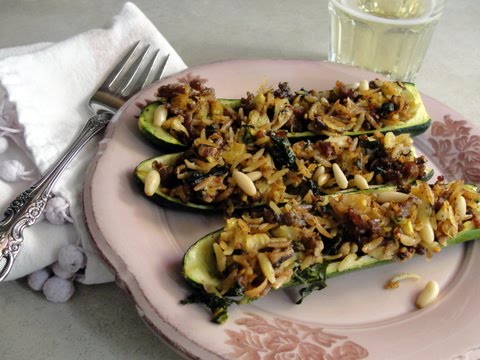
Stuffed Zucchini


This is one of my family's all time favorites- we just adore this and I've made many variations of the basic recipe. I first saw this recipe in the cookbook Chocolate and Zucchini- Daily Adventures in a Parisian Kitchen by Clotilde Dusoulier. Her recipe is vegetarian, but I found that adding a sausage that's been taken out of the casing and sauteed before adding the rest of the filling ingredients seems to suit my families taste. I've stuffed it with bulgur wheat, brown rice, cooked orzo, quinoa... depending on my mood and what's leftover in the refrigerator. No matter how many zucchini we happen to make, it never seems like enough because we devour it all in 10 seconds flat (well, not really, but you get the picture)!

Stuffed Zucchini (serves 4 as a light main course)
extra virgin olive oil
4-6 zucchini cut in half and scooped out with a small melon baller or tsp. spoon- reserve zucchini flesh
salt, pepper to taste
1 cup cooked bulgur, orzo, rice, or quinoa
1/8 cup pine nuts, toasted
1 small onion, diced
1/2 tsp. ground cinnamon
1/8 tsp. red pepper flakes
1 sausage removed from the casing
2 oz. goat cheese, crumbled
several sprigs of mint, chiffonade

Preheat the oven to 400 degrees and lightly grease a casserole dish with olive oil. After you've washed, halved and scooped out the flesh of the zucchini, place in dish and bake for 15-20 minutes or until slightly softened but still holding their shape. Chop the flesh and set aside.
Meanwhile, heat a pan over medium heat and saute the sausage until cooked through. Remove and chop coarsely. In the sausage oil, heat the chopped zucchini flesh, onions, salt, pepper, cinnamon, red pepper flakes, grain of choice and pine nuts until softened and heated through. Add the sausage bits and stir together. Remove from heat and add goat cheese and chopped mint, stirring until blended. Taste and adjust the seasoning, if necessary.
Stuff the zucchini shells with the warm filling and return to the oven for 10-15 minutes more until heated through and serve immediately.

Friday, April 2, 2010

Pork Tenderloin Roulade


This recipe is 5 ingredients long- yep, you read right, 5 ingredients! Though the grocery list isn't long, it definitely doesn't fall short on flavor. It's also a nice presentation since the ingredients are rolled in the pork. Try it, and trust me, you won't be disappointed.
The original recipe called for charring the pork on the grill, but it's the first week of April and we got snow today, so we weren't planning on going outside. Instead, I chose to braise the pork over med-high heat in a pan and then finish the cooking in the oven. It was nice and caramelized on the outside and slightly pink in the center, just the way I like it. Because I browned the pork before finishing in the oven, I had all of those lovely browned bits on the bottom of the pan. I don't know about you, but I can't let all that flavor go to waste, so I quickly chopped some veggies (carrots, onion, celery and shitakes), threw them in the pan to saute then deglazed with a splash of red wine and simmered till tender in some chicken stock. It was a nice accompaniment to the stuffed pork tenderloin. In a couple of weeks, I plan to prepare this recipe just as it was intended- on the grill and see which we like best. For now, here's my recipe:

Pork Tenderloin Roulade (serves 4)
1 1 lb. pork tenderloin
1/4 cup chopped shallots
1/4 cup crumbled goat cheese
3 Tbsp. chopped walnuts, toasted
2 tsp. chopped fresh thyme
salt, pepper to taste
1-2 Tbsp. olive oil

Place pan over med-high heat and add olive oil. Slice tenderloin lengthwise, cutting to, but not through the other side. Open halves, laying tenderloin flat. Place tenderloin between 2 sheets of plastic wrap, pound to 1/2 inch thickness using a meat mallet or heavy skillet. Preheat oven to 375 degrees. Sprinkle shallots, goat cheese, walnuts and thyme on tenderloin. Roll up, starting with long side, secure pork at 1 inch intervals with twine. Sprinkle with salt and pepper. Put tenderloin in hot pan to sear on all sides until browned, about 3-4 min. per side.

Remove from pan and place in a dish. Cover with tin foil and cook in the oven for 15-20 minutes or until inside is just slightly pink. Remove from oven and let rest for 5 minutes. Thinly slice and enjoy!

Sunday, March 28, 2010

Pasta with Creme Fraiche, Lemons and Basil


As I was perusing through my cookbooks trying to plan the meals for this coming week, I came across this recipe for Lotsa Lemon Pasta in the I Love Trader Joe's Cookbook. I looked at the ingredient list and saw that one of my favorite ingredients was featured- creme fraiche. If you've never had creme fraiche before, I can describe it's flavour and texture as somewhat similar to sour cream. It's tangy and ever so slightly sweet. Because of it's high fat content, it doesn't separate when heated and can lend itself well to either savory or sweet dishes. I continued to look down the ingredient list and saw that arugula was listed. Because I didn't have fresh arugula on hand but had just bought a bunch of fresh basil, I decided to substitute one green for the other. As I added ingredients and stirred the sauce together, I tasted it and decided that because of the aromatic lemon zest, I only needed the juice of one lemon instead of two. I also decided to add a dash of nutmeg to the sauce and I felt it was perfectly seasoned.
When the warm pasta was added to the creme fraiche sauce, I immediately smelled the citrusy zing of the lemon and I added the basil right before serving to avoid it turning an unattractive brown. We took our first bite and it was like Spring in our bowls. Seriously. It was fresh, aromatic and made me feel happy. The recipe below is written with my substitutions and additions. I hope you'll enjoy this first taste of Spring.

Pasta with Creme Fraiche, Lemons and Basil (serves 6)
1 7.5-8 oz. container creme fraiche
juice of 1 fresh lemon
zest of 2 lemons
1 cup shredded Parmesan cheese
1 16 oz bag of bow tie pasta (or other similar sized pasta)
freshly ground pepper and salt, to taste
dash of nutmeg
10-12 leaves of fresh basil, chiffonade

Bring a large pot of salted water to boil and cook the pasta al dente. Drain the pasta and set aside.
Meanwhile, in a large bowl, stir together the creme fraiche, lemon juice, lemon zest, salt, pepper, dash of nutmeg and Parmesan cheese together. When pasta is slightly cool, add to sauce and stir. Right before serving, stir in basil. You can add more Parmesan and basil to the top, if desired. Bon Appetite!

Saturday, March 20, 2010

Fish Tacos


I'm the first to admit that I don't know much about fish tacos except that there's a place in town called Bend Fish Company that makes a pretty good and spicy version. I came across this recipe last summer and tucked it away in my file, waiting for the day I'd get inspired to try it. So glad I did. These fish tacos were so yummy, combining the sweet flavor of mango, the creamy avocados, earthy corn tortilla, flaky tender fish and the sweet/sour radish and red onion pickles. We devoured our dinner and were sad the ingredients ran out. We'll definitely be making these again sometime soon.


Fish Tacos (serves 4)
1/2 cup red wine vinegar
1/3 c. sugar
1 tsp. chili powder, divided
1/2 sliced red onion
6 thinly sliced radishes
1 lb. tilapia fillets
1/4 c. plus 2 Tbsp. fresh lime juice
4 garlic cloves, minced
1 peeled firm ripe mango, cut into thin slices
1 sliced peeled ripe avocado
fresh cilantro leaves
canola or vegetable oil
1 pkg corn tortillas (6 inch size)
taco condiments: sour cream, salsa, salsa verde etc...

combine the red wine vinegar, sugar and 1/4 tsp. chili powder in a small saucepan, bring to boil. Remove the pan from heat, and stir in the red onion and radishes. Let stand, uncovered, 10 minutes or until cooled
rinse fish, pat dry. Gently toss with 1/4 c. lime juice, 1/2 tsp. chili powder, and garlic in a shallow glass dish. Marinate for 10 minutes at room temperature.
Gently toss mango and avocado in small bowl with remaining 1/4 tsp. chili powder and 2 tbsp lime juice.
Preheat a lightly oiled grill rack or grill pan.* Remove fish from marinade, and grill, turning once, 2-4 minutes per side or until cooked through and golden brown. Transfer to a plate, cover and keep warm.
Grill tortillas lightly until pale golden and slightly crisp. Transfer to serving plate.
Fill tortillas with fish, pickled vegetables, avocado and mango mixture, cilantro and other condiments as desired.

*Note: we didn't grill our fish. Instead we sauteed it in a pan on the stove. Next time we make it, I'll definitely try using the grill

Tuesday, March 16, 2010

White Wine Coq Au Vin


5:15 pm I have a confession to make. Usually when you hear those words you expect something terrible to follow. I hope this is the exception...
Here's the confession: I hadn't tried this recipe before I started to compile this post. I came to the computer right after I set the pot of coq au vin to simmer. I was expecting an outstanding outcome before I'd even tasted it. Why? The ingredients for one thing. How can you possibly go wrong with wine and bacon. The other? The smell filling the kitchen from the steaming pot was so appetizing I just knew I had a winner on the stove. Am I wrong? We'll have to see....
6:06 pm Oh my gosh, this dinner was so incredibly delicious!! You definitely taste the wine but you also have the salty bacon, the tender chunks of chicken, sweet carrots and the thick broth is so comforting. In the words of my family: It's a keeper! It's blog-worthy. Please try this white wine coq au vin for yourself and tell me what you think. :)


White Wine Coq Au Vin (serves 4)
4 1/2 Tbsp flour
salt, pepper to taste
1 1/2 tsp herbes de Provence
4 slices bacon, chopped
1 lb. skinned, deboned chicken thighs (I used chicken breasts)
2 Tbsp. olive oil
1 1/2 cups baby carrots
3 stalks of celery
1 medium onion
1 1/3 c. chardonnay
2 c. chicken broth
1/2 c. flat leaf parsley sprigs, chopped
1/4 c. tarragon sprigs, chopped

In a plastic bag, shake flour with salt, pepper and the herbes de Provence, set aside.
In a large pot over med heat, brown bacon, stirring occasionally about 5-7 minutes. Meanwhile, cut chicken into 1 inch chunks, the shake in flour to coat.
With a slotted spoon, transfer bacon from pan to paper towels. Brown half the chicken in bacon fat, stirring occasionally, 3-5 minutes. Transfer to a plate. Repeat with remaining chicken, adding oil to pan. Meanwhile, cut carrots in half lengthwise and cut celery into slices. Chop onion.
Add vegetables to pan with salt and pepper and saute until onion is golden about 5 minutes.
Add wine to vegetables, making sure to scrape up all the browned bits at the bottom of the pot. Add chicken stock, chicken and bacon. Cover and bring to a boil over high heat. Reduce heat and simmer covered until vegetables are tender, about 15 minutes. When ready to serve, add parsley and tarragon. Enjoy!

Friday, February 26, 2010

Greek Style Couscous Pearls


I'm pretty sure most people have seen and tried couscous- you know those tiny granules of semolina that are steamed. But have you tried Israeli couscous? They are also made of semolina pasta but resemble pearls or white peas. Israeli couscous are larger than traditional couscous and has a much creamier texture. I recently tried it for the first time and absolutely love it!! You need to toast the couscous with a little bit of olive oil (much like you do for risotto) until it is nicely golden brown. This is a critical step and shouldn't be skipped because it's this toasting that gives the Israeli couscous such a wonderfully nutty flavor.
After I bought the couscous, I went looking for the perfect flavors to go with it. I had a recipe for Greek salad and since Greek salad is sometimes paired with pasta, I thought the two would go together nicely. I was in for a big surprise. This dish was so tasty and all the varied textures were amazing together.
Chris asked to bring the leftovers back to work with him after he came home and ate a big bowl of it for lunch! Two hours later, I receive a text from him that said one word: yummy

Greek Style Couscous Pearls (serves 4)
1 1/2 cups Israeli couscous
1 Tbsp. of olive oil
1 3/4 cup plus 2 Tbsp. water, broth or stock
for salad:
1 cucumber, seeded and diced 1/4 inch thick
1/2 red bell pepper, diced 1/4 inch thick
1/2 yellow bell pepper, diced 1/4 inch thick
1/2 pint cherry or grape tomatoes, halved
1/4 red onion, diced small
1/3 c. feta cheese, crumbled
1/3 c. kalamata olives, pitted and sliced
for vinaigrette:
2-3 cloves garlic, minced
1 tsp. dried oregano
1 tsp. dijon mustard
1/4 c. red wine vinegar
salt, pepper to taste
1/2 c. extra virgin olive oil

Drizzle 1 Tbsp. olive oil in a sauce pan over medium heat. Add couscous, stir until evenly coated with oil. Toast until lightly brown (about 5 minutes). Slowly add the liquid (water, stock or broth) and bring to a boil. Reduce heat to med. low and cover. Simmer for 12 minutes or until liquid is absorbed. Remove cover and take off the heat.
Meanwhile, make vinaigrette and then pour over warm couscous.
Place all remaining salad ingredients into a large bowl. When couscous is cooled, add to bowl and toss all together. Set aside for 30 minutes to allow the flavors to blend. Serve at room temperature and enjoy! :)

Friday, February 19, 2010

Baked Shrimp Scampi


We've all had shrimp scampi that's been cooked on the stove. I'm a big fan of easy to make, delicious dishes and I came across this recipe in Ina Garten's new cookbook Back To Basics. The lemony and garlic flavor really shines through with the delicate shrimp and is complemented by the crunchy panko crust. It's so good. It's going back for seconds, so good. Super simple because you don't have to babysit it on the stove, you just assemble everything, pop it in the oven and finish off with a squeeze of fresh lemon juice just before serving. We served our scampi over a bed of couscous, but you could always serve it with the traditional pasta.

Baked Shrimp Scampi (serves 4)
1 1/2 lbs raw shrimp *
3 Tbsp. olive oil
2 Tbsp. white wine
salt and pepper to taste
1 stick butter, softened at room temperature
4-6 garlic cloves
1/8 c. minced shallots
2 Tbsp. parsley
1 tsp. minced fresh rosemary leaves
1/4 tsp. crushed red pepper flakes
1 tsp. grated lemon zest
2 Tbsp. freshly squeezed lemon juice (plus more for a finishing squeeze)
1 extra large egg yolk
2/3 c. panko

Preheat the oven to 425 degrees. Peel, devein and butterfly the shrimp, leaving the tails on (*I used a smaller count shrimp since thats what we had on hand, so I didn't butterfly it). Place the shrimp in a mixing bowl and toss gently with the olive oil, wine, salt and pepper. Allow to sit at room tempaerature while you make the butter and garlic mixture.
In a small bowl, mash the softened butter with the garlic, shallots, parsley, rosemary, red pepper flakes, lemon zest, lemon juice, egg yolk, panko, salt and pepper until combined.
Place shrimp in a single layer inside a 14 inch oval gratin dish. Pour the remaining marinade over the shrimp. Spread the butter mixture evenly over the shrimp. Bake for 10-12 minutes, until hot and bubbly. Place under the broiler for a minute or so, to brown the top. Squeeze a fresh lemon over the finished dish and serve.

Saturday, January 23, 2010

Citrus and Curry Baked Mahi


WOW. Just one word to describe the incredibly delicious smells emitting from the oven as the mahi mahi baked to perfection. Curry powder... lemon and lime zest.... chopped shallots.... and olive oil... all working in harmony to create a dish that was fantastic. The curry fragrance that filled the house during the baking made me so hungry, I just couldn't wait to sit down and eat. Eating more fish for health is easy to do with a recipe like this one. Try it, and you'll be saying wow too :)

Citrus and Curry Baked Mahi-Mahi (serves 4)
1 cup olive oil
zest from 1 lemon and 1 lime
squeeze of lemon and lime
1 med-large shallot, minced
1/4 of a fennel bulb, minced (yes, my new favorite ingredient!)
salt, pepper to taste
1 T. curry powder
4 mahimahi fish fillets (or any white fish your prefer)

Put all ingredients into a gallon sized ziplock baggie and let marinate in the refrigerator at least 12 hours but not more than 24 hours.
Heat oven to 400 degrees. Place fish fillets onto a baking rack over a sheet pan. Make sure all your marinade is scooped on the fish fillets. Bake for 15 minutes or until fish flakes easily with a fork. Enjoy!

(serving suggestion: serve with rice, quinoa or other favorite grain)

Thursday, January 14, 2010

Maple Grilled Salmon with Cirtus Salsa


Let's get one thing straight here. Other than Ahi I don't care much for fish. I never order it in the restaurants (unless it's raw Ahi or blackened Ahi or Ahi prepared in a similar fashion), and I rarely prepare it at home. I love other types of seafood- crabs, lobster, shrimp, mussels, calamari, octopus... but fish, not so much.
That is, until recently. More specifically, January 1, 2010. I've been trying to cook and eat more fish. Why? Simply because of it's many health benefits- mainly the Omega 3 fatty acids and low fat, high protein content of fish.
Well, today I found another winner. A 9 out of 10 scoring. A two thumbs-up, please make this again sometime soon vote. A this is so good I'm going for seconds and thirds recipe. Really. The subtle sweetness of the pure maple syrup with the citrus-y zing from the oranges and grapefruit, the salty bite of capers, the fresh mint and slight spice from the red pepper flakes.... what can I say other than simply delicious. Please try it and tell me what you think.

Maple Grilled Salmon with Citrus Salsa (serves 4)
4 salmon fillets
4 T. pure maple syrup
salt and pepper to taste
2 T. capers, roughly chopped
2 T. fresh mint leaves, chiffonade
sprinkle of red pepper flakes
1 T. chopped parsley
2 green onions, finely sliced
segments only of 1 orange and 1/2 grapefruit
2 T. olive oil
zest of 1/2 lemon, and 1/2 orange
1/8 c. freshly squeezed lemon juice

Prepare the citrus salsa: Mix together capers, mint, red pepper flakes, parsley, green onions, orange and grapefruit segments, olive oil, orange zest, lemon zest and lemon juice together in a bowl. Set aside.
In the meantime, heat a large grill pan on med-high heat, oiling with olive oil so fish won't stick. Sprinkle salt and pepper to taste on salmon. Brush with pure maple syrup. Repeat with other side of fish.
Cook fish for 4 minutes on each side (or until done), flipping once. Serve immediately with citrus salsa spooned over the top of the salmon.

Friday, January 8, 2010

Oeuf Cocotte (Egg Casserole)


It's been a busy week- getting back into the school routine (waking up early- ugh!), getting the girls to dance class, and resuming french lessons. Since it's the end of the week, I wanted to make a dinner that was uncomplicated and delicious. Simply put, oeuf cocotte, which is french for egg casserole. It is a rustic kind of dish made with a couple of eggs cooked in a ramekin with a few other delicious and equally simple ingredients. Pair it with a glass of white wine, a few slices of toasted french bread and that's it. So without any further complications, here's the recipe:

Oeuf Cocotte (Egg Casserole- 2 servings)
1 1/2 tsp. fresh basil, chopped
1/2 tsp each fresh thyme and flat leaf parsley, chopped
1-2 cloves of garlic, finely minced
2 T. half and half
1 T. freshly grated parmigiano reggiano
2 small pats of butter
4-6 eggs depending on your appetite (I usually eat 2, Chris eats 3)
salt and pepper to taste

Put a pat of butter, the minced garlic and 1 T. of the half and half into each oven proof ramekin. Broil on high for 2 minutes or until the butter has melted and the half and half is bubbly and starting to brown. Remove from the oven and lower temperature to low broil. Crack 2-3 eggs into each hot ramekin and return to oven. Broil on low for an additional 10-12 minutes or until the eggs are baked, but still slightly runny. In the meantime, chop your herbs and mix together in a small bowl. Once your eggs are cooked, remove from the oven and sprinkle tops with salt, pepper, parmigiano cheese and mixed herbs. Serve immediately with crusty bread for dipping.

Thursday, January 7, 2010

Pilaf with Pesto, Tomatoes and Parmesan


I've been on a bit of a "health kick" lately- blame it on a combination of the New Year and the result of freely overindulging during the holidays. Anyhow, I'm currently on a mission to encourage myself and my family to try new foods, and embrace more fruits, veggies, raw nuts and whole grains. Tonite I decided to try the Kashi brand 7 whole grain pilaf with the following loose recipe (no measurements in the ingredients, it's all just to taste) and guess what? Chris and I both really enjoyed the chewy nutty flavored pilaf mixture. The pesto, fresh basil and tomato flavors really combined nicely together to make a healthy, but more importantly- delicious, quick and easy dinner. Bonus: Noelle had seconds and asked me to make it sometime again!!

Pilaf with Pesto, Tomatoes and Parmesan
Stir prepared pesto into cooked grains (I used Kashi 7 whole grain pilaf cooked in vegetable broth, but leftover brown rice, orzo, or couscous would work equally as well). Season with salt and pepper to taste. Toss with freshly grated Parmesan, chopped basil and halved cherry tomatoes.

Wednesday, January 6, 2010

Provencal Chicken Stew


It's been one of those rainy, cold and dreary days that's got me thinking about Chicken Stew. Not just any bland flavorless chicken stew, but the kind of dinner that has you sitting down in front of a big warm bowl of deliciousness that's been bubbling away in the slow cooker for hours filling the home with wonderful aromas. You know what I'm talking about. People walk through the door and immediately say "mmmmmmmm what is that cooking? and you answer, "Provencal Chicken Stew" and they say "wow, it smells fantastic, you sure must've been busy cooking this dinner" and you smile because you know that the slow cooker did most of the work for you. All you have left to do is sit down and enjoy the dinner that effortlessly came together melding the briny flavor of kalamata olives with the sweet taste of crushed tomatoes and white wine, herbs and garlic. Say it with me, MMMMMM. It's time to get your slow cooker out from the cabinet and get started :)

Provencal Chicken Stew (serves 4-6)

3/4 c. plus 2 T. all purpose flour
salt, pepper, to taste
1 chicken, cut into serving pieces and skinned
1/4 c. olive oil
1 yellow onion, finely chopped
2 cloves garlic, minced
1/2- 2/3 c. dry white wine
1 (14 1/2oz) can crushed tomatoes
1/4 c. freshly chopped parsley for garnish
1/4 c. fresh basil leaves, cut into chiffonade, for garnish
1 c. kalamata olives for garnish

combine the 3/4 c. flour and salt in a plastic bag. Add the chicken to the bag, several pieces at a time, and shake to coat completely.
Heat a large saute pan over medium high heat and add the oil. Add the chicken and cook, turning once for 8-10 minutes, creating a lightly browned crust. Remove the chicken from the pan and add to the slow cooker. Add the garlic to the pan and stir for 2 minutes. Add the wine and stir to scrape up the browned bits from the bottom of the pan. Increase the heat to high and add the tomatoes and pepper to taste. Cook, stirring frequently for 10 minutes so some of the tomato liquid evaporates. Pour the onion mixture over the chicken in the slow cooker. Add kalamata olives to top. Cover and cook on low for 3-8 hours. At 3-4 hours, the chicken will still be firm and hold it's shape. At 6-8 hours, the meat will be falling off the bone.
Diving the chicken among dinner plates and garnish with the parsley and basil.

*Note- You may be familiar with slow cooker recipes that dump all ingredients into the cooker and turn on. This is not one of them. Do not skip any of the steps, as each in important to creating a dish that is perfectly seasoned, delicious and well cooked.